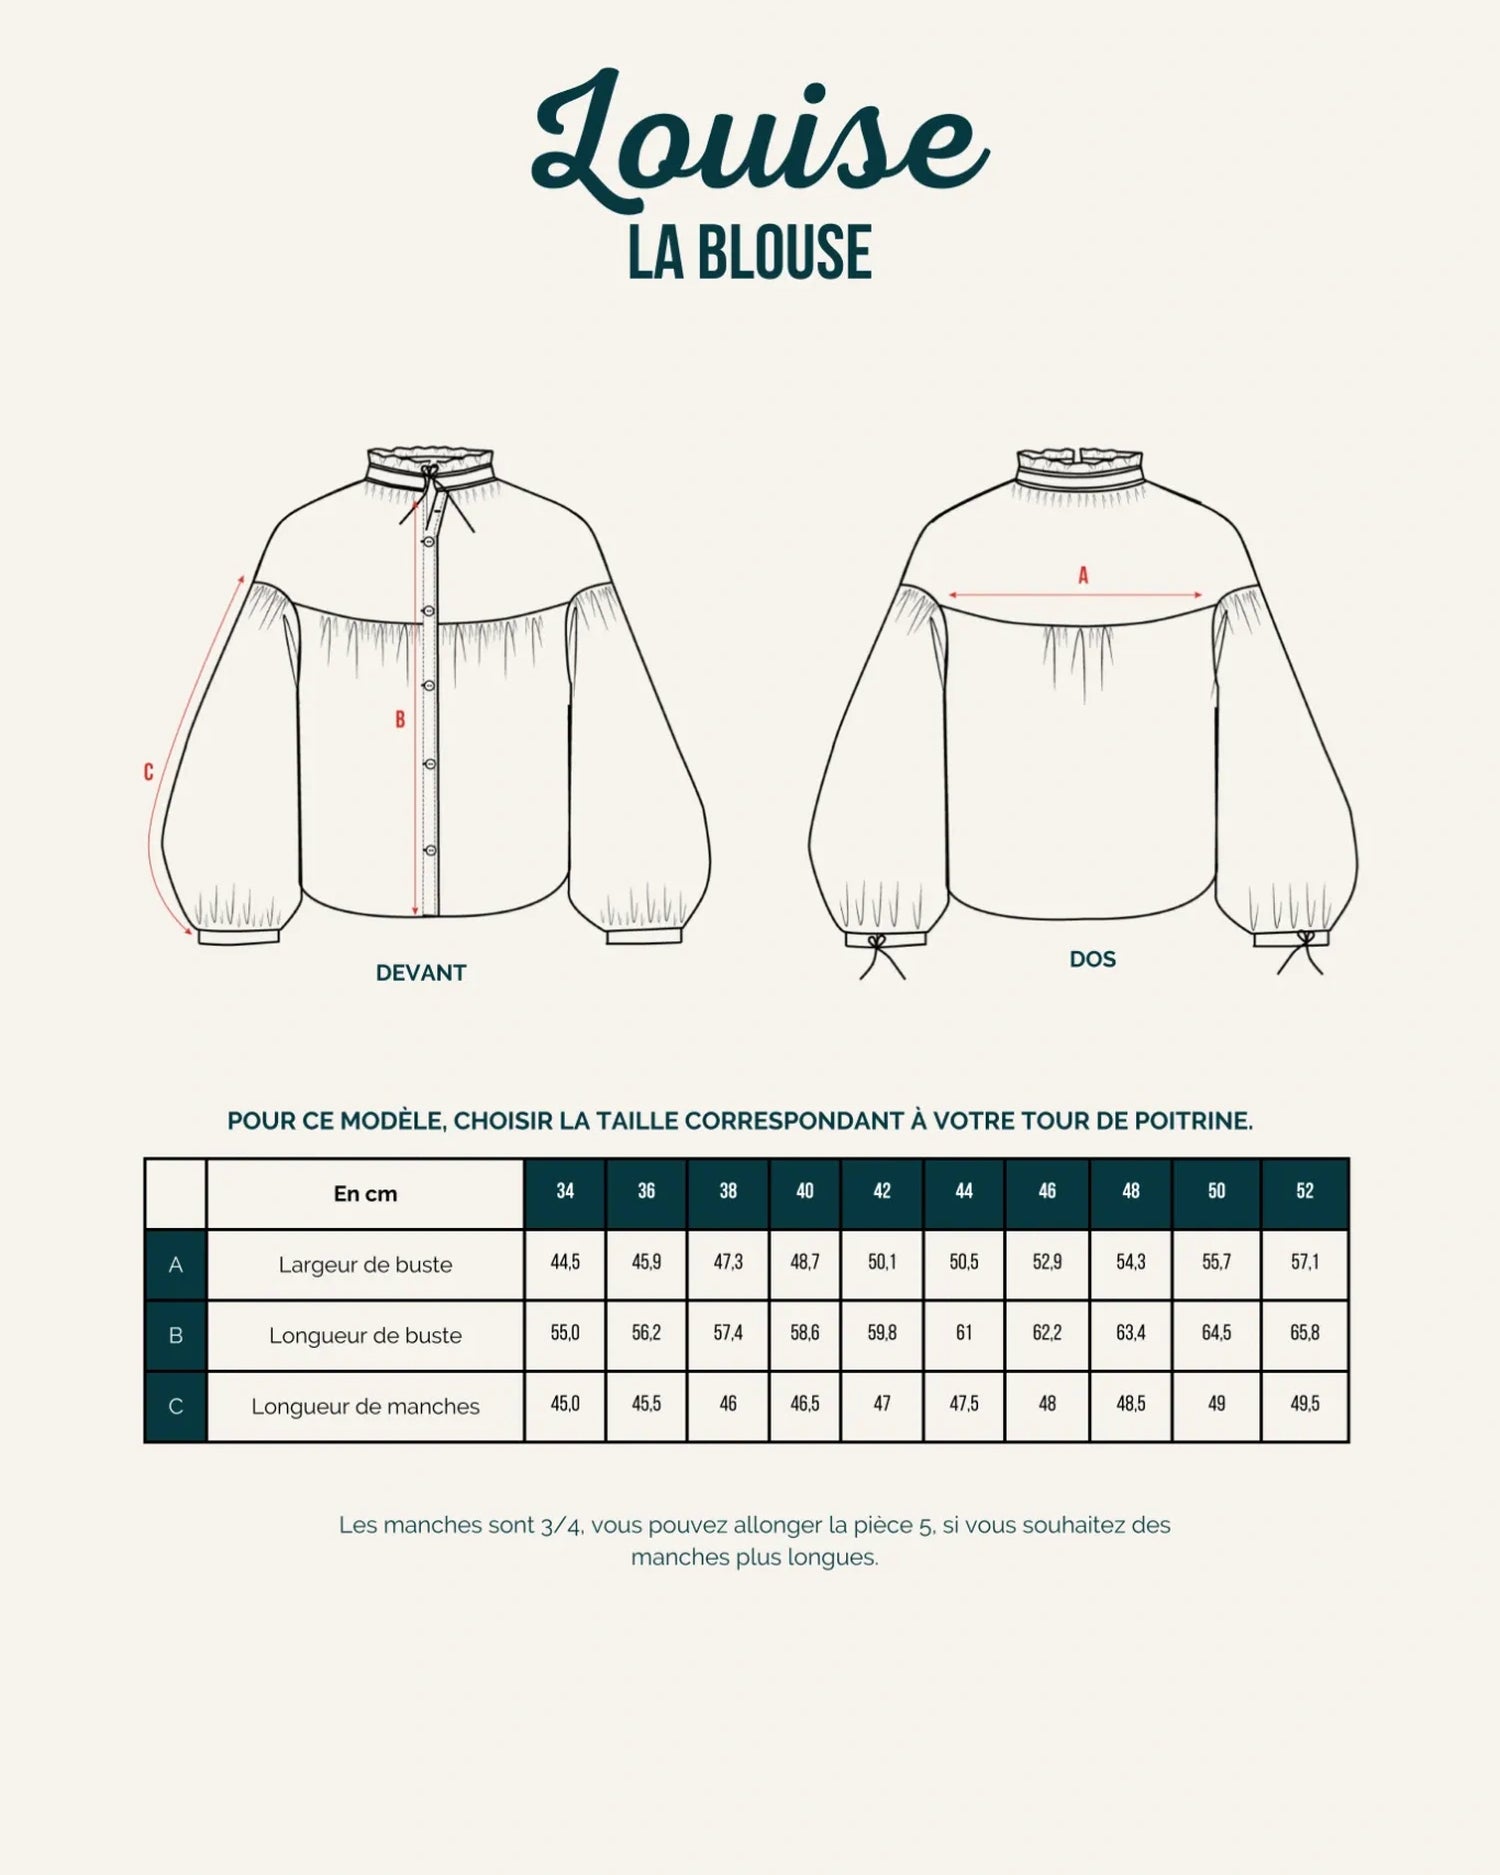


The scrunchie is a timeless fashion accessory that reinvents itself and transcends generations. Much more than just a hair accessory, it proves to be a true style asset, capable of adding a special touch to your outfit. Whether worn on the wrist or in your hair, having a scrunchie is great, but when you've made it yourself, it's even better.
Yes, a scrunchie is an easy sewing project, accessible to beginners. It's even an ideal project to get started with. And to feel even prouder, what could be better than making a scrunchie using upcycled materials?
To help you out, here's an easy tutorial for sewing a scrunchie from upcycled materials. If you don't have the necessary materials or equipment, don't worry, our scrunchie kit contains everything you need to make two pretty upcycled scrunchies.
If you are looking for other project ideas to get started in sewing, then our article " Which sewing project for beginners " will be your ally.
Materials needed to sew an upcycled scrunchie:
To complete these different sewing projects, you will need:
• A sewing machine
• Sewing thread
• A flat elastic band approximately 12 cm long
• Scissors
• A safety pin
• An erasable pen or chalk
• A rule
• Fabric to be repurposed: we give you some ideas in the following paragraph.
What kind of fabric can we use to make the scrunchie?
Good news, making a scrunchie requires very little material (a 50cm x 12cm piece of fabric will be more than enough, which you can of course adjust), so it is an ideal project to make from upcycled (or repurposed) materials.
When it comes to choosing materials, several interesting options exist: cotton, velvet, or silk for a more elegant look, but the fabric will be more "slippery." This offers a wide range of possibilities among fabrics to be repurposed.
 We'll start with a classic: reusing fabric scraps ! These are often overlooked, even forgotten, yet they're brimming with potential. Go check your fabric scraps; we're sure one of them will be perfect as an upcycled scrunchie.

Another possibility is to repurpose a tie , a symbol of elegance. Some patterns are difficult to wear, and the tie might end up forgotten at the back of a closet. But don't panic, you can repurpose that lovely tie, transforming it into a stylish and original upcycled scrunchie.
 Use a sleeve from a damaged or forgotten shirt at the back of your closet. You can even make several scrunchies. In our example, one shirt sleeve will be more than enough.
Don't have enough fabric scraps? Or perhaps you'd like to add a touch of originality to your accessory? Patchwork is a great solution. Simply sew different pieces together (avoid using too many pieces, as the seams might get in the way during the project).
Once you've chosen the fabric you want to transform, all that's left is to get started. Here's our sewing tutorial to make your upcycled scrunchie.
The tutorial for sewing an upcycled scrunchie
Depending on the material you choose to upcycle, you might need to start by flattening your fabric piece. Simply use your seam ripper to undo any existing seams, trim the threads with scissors, and then iron to start fresh.
In our tutorial for sewing a scrunchie, we will show you the different steps to make the scrunchie from a tie.
1. First, unpick the tie using a seam ripper, then remove the reinforcement and the fusible interfacing. Iron the tie.
2.  Cut a rectangle 50 cm long by 12 cm wide. You can adjust the length of the fabric depending on the desired volume of ruffles. Also cut out the bow. You can use our free scrunchie pattern .

3. Fold the main fabric strip in half, right sides together, then pin along the raw edges.
 4. Sew 1 cm from the edge all the way around, starting and stopping 2 cm from the ends. This will leave a small opening, which will be useful for the rest of this tutorial. Don't forget to secure the stitches at the beginning and end of your seam.

5. Use the safety pin to turn the strip of fabric right side out. Simply slide the pin from one end to the other.
6. Iron to flatten your seam neatly
7. Place the two ends right sides together, then sew 1 cm from the edge. This seam is the most complex; it's still manageable, but take your time and roll the fabric gently.
8. Cut a 12 cm length of elastic, secure it with a safety pin, then insert it through the small opening. The idea is to slide the pin through the elastic to wrap it all the way around the scrunchie. Pull both ends of the elastic through, then tie a small knot by hand.

9. Close the opening with a small hand stitch, or with a machine stitch as close to the edge as possible.

There you go, the trick is done! In just a few minutes, you've given a pretty piece of fabric a second life.
And if you want more ideas for using your fabric scraps, feel free to check out our Instagram account , we share lots of ideas and video tutorials there!
As you've probably guessed, before throwing away your fabric scraps or old clothes, why not give them a second life? You can use them to create pretty scrunchies, an easy and accessible sewing project for everyone, but also plenty of other accessories or even more statement pieces!
Every little scrunchie we make is a small step towards a greener world and more conscious fashion! Need inspiration? Find our upcycled scrunchies right here .
We can't wait to see your creations, so feel free to share them on our Instagram account #MaeliParis